May 31, 2013

Friday Finds

I hope everyone's been having a good week.

I'm super excited that installation of our brand new, first-ever sprinkler system has begun! 


Work was delayed by two days of badly needed rain and started yesterday. I'm loving watching the workers remove the old weeds lawn, and I'm beyond happy that I won't be watering by hand this summer. Yay!

Friday Finds today are a mixed bag of even more delight!


 Melissa from The Snap Academy shared this reclaimed pallet wood photo display at Going Home to Roost. Melissa used some twine and clips to hold a constantly changing array of Instagram photos printed directly from her cell phone. 


 Carol over at The Polka Dot Closet created this pretty bulletin board and its shabby lace pockets. 


 Dorrie and her husband are finding all kinds of wonderful surprises hidden away behind their new home's walls and ceilings over at Tuesdays with Dorrie.


 Kathleen from Faded Charm shares her lovely bathroom. I love the gleaming wood counter.


 At Away for the Weekend Karen shared this stunning stained glass window.


(From the May 29th Post)
  Kris shares her garden with us over at Junk Chic Cottage. Kris has a simply amazing way with flowers. 


Andrea shares the recipe for her son's favorite Lemon Lush at Faded Plains.  

My daughter and I are starting a new diet Monday, so I'm making Andrea's Lemon Lush on Sunday! Hah!

Happy Friday, everyone!

Have a wonderful weekend!


Featured on Friday Finds? Grab a button!


May 30, 2013

Sage Decorating Advice

You may have noticed the floor beneath the TV Console I blogged about in my previous post. I tried to hide as much of it as I could, but it couldn't help sneaking into the photo. Floors have a way of doing that.


I bought a 13'x15' piece of neutral comfy carpet and had it bound at a total cost of about $200 to cover most of this ugly floor in my family room while I await my dream hardwood floors. Meanwhile, I try to avoid photographing them. 


I feel like my floors are the elephant in the room no one wants to acknowledge, but there they are. So here's the background on the faux brick vinyl flooring that 
covers my kitchen, hallway, and family room.


I wish I could say someone else was responsible for the floors pictured in these grainy old photos, but I can't hide.

It was me. 

In my defense, twenty-five years ago, when these floors were installed, vinyl sheet flooring was the "in" thing. I saw this pattern in another old house in my historic neighborhood and fell in love with it. I had two little children, and what is now our family room, was then their play room, connected to the kitchen by a long hallway. (Our house is called a shotgun floorplan because you can stand at the front door and shoot a gun through the whole house to the 
back door, though I haven't actually tried it.) 


Thinking that my darling little girls would scratch hypothetical hardwood floors with sand from the sandbox, spill paint on them from their easels, and stain them with grape juice from their sippy cups, I chose this vinyl as something worry free that I wouldn't have to keep a constant careful eye on.

Plus, we were young and house poor, remodeling a kitchen and bathroom in the old part of the house and building on a huge new addition. We put our money into square feet and didn't have much left for the finishes. 


In spite of that, we did get the best we could afford, and this floor was the highest-end Tarkett vinyl floor available. It came with a lifetime warranty, so how could we go wrong?

 This I can attest to: our Tarkett floor earned its lifetime warranty. It is hard as rocks and never showed a scratch. I have used paint removers and even sand paper on it, and nothing ever damages it. I was very happy with it for about ten years until the trend wore out, I got tired of the pattern, and I wanted something I didn't feel embarrassed by. 

Rule #1: If you can afford to remodel regularly, go ahead and get the trendy finishes that are "in" now, and just change them when you grow tired of them, even if they haven't worn out. I couldn't afford to change my trendy vinyl and have had to live with it for ten years past the trend's time. Ugh! The best advice I've seen on avoiding the issue of trendy finishes was from Nicole Curtis on the HGTV show, Rehab Addict. She advises never put a finish into your remodel that you wouldn't have found available the year your house was built. That way, it will always look authentic and never trendy. There was no sheet vinyl flooring available in 1910 when my home was built, and I wish I would have bit the bullet and borrowed a little more money at the time for hardwood. I could have just refinished the wood floors when the girls were grown and done with the sandbox.


Like my hand-me-down Windsor chairs, the original hardwood Maple floors in the old part of our house will never go out of style in our period home, and I've never grown tired of them. 


Rule #2: If you want your finishes to last a lifetime, make sure the installation will also. While the Tarkett Vinyl itself earned its lifetime warranty, the entire floor installation did not. Don't mistake the lifetime warranty of your finish with how long the entire job will last. The surface of our vinyl floor is almost still like new, but the installation gave out about the same time the solid vinyl trend did. The seams between the big sheets came apart and curled, and we literally are holding them together now with clear packing tape. No glue we've tried will hold the curling edges down. 

We found out that many glued-on floor installations, like vinyl, linoleum tiles, and laminate rarely come with much of a warranty. And if it does, this installation warranty, like the floor material itself, is only as good as the company behind it. In our case, the company we used made an excuse about the glue and wouldn't stand behind the installation. I doubt they get a lot of repeat business. Meanwhile, the solid wood floors that were nailed down in the old part of the house are 110 years old and still going strong. So, don't just think about the finish, think about the installation, too. 

This morning, when I looked back at my blog post from yesterday and winced, yet again, at the sight of my curling vinyl floors, I thought to myself, "It's time to address that elephant in the room, and it will be worth it if I can help even one young woman from making the same mistake I made."

 And, honestly, it feels kind of freeing. In fact, I have a few more big elephants around my house that you just might hear trumpeting in future posts.


Watch out! 


May 29, 2013

My Television Console

I'm so excited to show you what I've been working on the past week!


I snapped this photo on my phone of this big dresser I found recently at a local consignment shop. I'd been searching for one for a long time.

 My husband thought I was off my noggin' when I told him it would soon be a charming piece of furniture holding his treasured 47" flat screen TV and soundbar in our family room. 

He definitely didn't see my vision. 

So it was fun and very gratifying to watch him come around to my side as I completed each step of its transformation. 

First, I put it outside and sanded all the stain off the top with an orbital sander, being careful not to sand through the thin veneer. Then I sanded the sides by hand with sanding sponges to remove the shine. 


 I brought it inside and stained the top with one coat of Minwax dark walnut stain followed by three coats of wipe-on polyurethane.


Next, I painted the bottom with two coats of Glidden flat paint. I sanded both the poly and paint between coats for a smooth-as-silk finish on both the top and sides.


The color I used is called Linen


I put the knobs and handles in a cardboard box and painted them with oil rubbed bronze spray paint. 


Then I got to work distressing everything by hand. And, boy, was it a workout! 


Are you starting to see my vision? 

Next, I rubbed clear furniture wax onto the paint and buffed everything to a soft glow. 


I stained the middle drawers to match the top and finished the cabinet door that hides them, just in case we ever want to use this as a dresser in a bedroom. But for now, the drawers and door are stored away in the basement. 


In their place are some shelves I made to hold the cable box, bluray player, and a basket. Holes were drilled through the back for the cables and wires.


The television and soundbar fit just right on top, and there's tons of storage in the drawers for DVDs and all our electronic cables, chargers, and manuals. It's a great TV console.

I have a whole new respect for bloggers who tackle furniture refinishing projects like this every week. It was a TON of work! But it was so worth it. The custom vintage look fits our cottage perfectly and adds so much charm to our family room. 

Here's a look back:


  What a difference!


It feels wonderful to finally have the exact piece of furniture I've wanted for such a long time.

Thanks so much for letting me share it with you today!

I'm partying this week at these fabulous blogs


May 24, 2013

Friday Finds

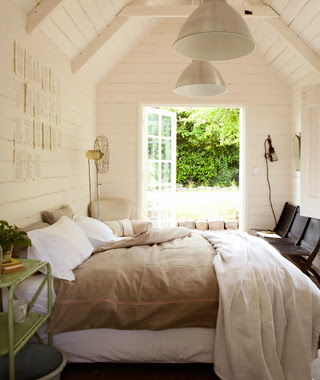
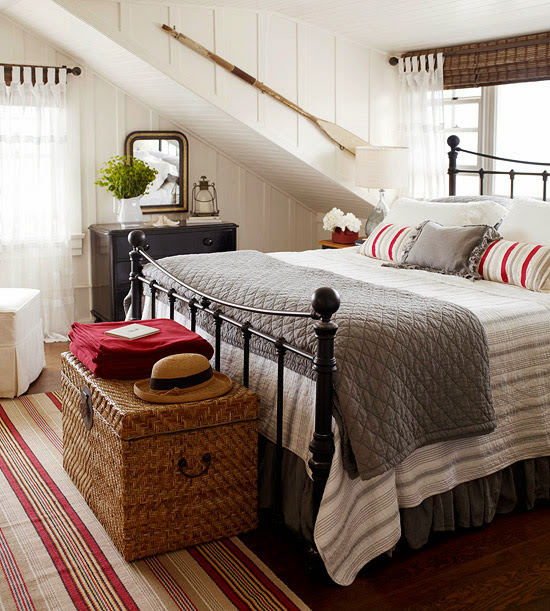
I'm planning a master bedroom redo later this year, and I've been pinning lots of photos to my Bedrooms Pinterest Board for inspiration. Today, for Friday Finds, I thought I'd share my favorites. 
Sometimes I'll pin a bedroom that has something in particular that catches my eye, like a wall color, a lamp, or a dust ruffle.  But these bedrooms are my favorites, and I'd love to wake up in any of them just as they are. 


House to Home

Country Living

Restyle Source
Better Homes and Gardens


The White House (Garden Bedroom)


Amber Interiors


Country Living


Garnet Hill


Luxe Living Interiors


House of Turquoise


Top This Top That
Better Homes and Gardens


House of Turquoise
Aren't they beautiful? Did you find a favorite? 
Thanks so much for coming by today. 
Hope you have a Happy Friday! 
 

May 23, 2013

Rebuilding My Yard


I went outside today, camera in hand, to take photos of my yard. It wasn't until I looked around with an eye towards sharing it with you that I realized I have no yard worth sharing! 

So I've decided to share the process of building our new yard instead. 

This was my backyard last July: 


Green, lush, shaded, and full of healthy plants and flowers.

And this is my backyard today. (It actually hurts a little to look at it!) 

 We had the large old shade tree removed earlier this spring for safety reasons, and now must redesign our yard to survive the high desert sunshine left in its absence.


First, since the fence had to be taken out for the tree removal, my husband replaced all the old posts and side rails before putting it back again. Then he rebuilt part of the deck and added a new stair where the tree trunk had been.


 We're having automatic sprinklers installed soon in both the front and back yards, but our main water line wasn't adequate. The water company said we're one of the last old homes in the North End to be updated, probably because I've been watering the yard myself one little section at a time for the past twenty-five years! I can't tell you how excited I am about not having to do this anymore!


 After the street service was updated by the water company, we had new larger pipes installed all the way to the house by another excavator and plumber. The entire front yard was pretty much dug up by the time it was all done. 

 
Meanwhile, we used hoses to map out where we want our new planting beds and grass in the backyard. (The black hose is where the new border will be.) As you can see, the old shade grass didn't last long in the sun, and we are planning a smaller lawn of drought and sun tolerant grass. We're also having the sad-looking front yard grass replaced with a new healthier drought tolerant lawn.

The tall Karl Foerster grasses that we removed to make room for the tree removal equipment will go back in along the fence with more drought tolerant sun loving plants filling in the larger beds. We're also adding a couple of smaller beds on either side of the new deck stairs. We borrowed the huge plastic pots for storing the grasses from our local nursery. 


We don't have any homes nearby directly behind us and can see the the cute houses on the next block over and the snow capped mountains of the Boise Front off in the distance over the fence and through the trees. 


We also love seeing the huge thunderheads building up in the sky over the Rocky Mountains. It all makes our tiny yard seem much larger than it is, and for living in the middle of a city we think we have a great view. 

  
 There is a house behind us on the right, though, and it will be screened by this new tree we planted. We chose an Eastern Redbud that will stay small enough not to interfere with the power lines above and won't drop messy fruit on the sidewalk leading to the alley below. On such a small city lot, every little decision matters. Unlike my favorite Dogwood Tree, this Eastern Redbud will tolerate the hot full sun. It also gets pretty pinkish red flowers in the spring.


It sounded so good for our tiny yard, in fact, that we planted a twin on the other side by the shed to screen the house there on the left from our view, too. We've had problems with the squirrels damaging trees in the past, but they don't seem to like chewing on the Redbuds for some reason.

This is my side yard with the cute potting bench my husband made me last fall. I'm dying to fill it with my gardening tools and share it on my blog, but as you can see, the mess around it doesn't make for good photos. 


 These are roses we've had to dig up and store in buckets until the sprinklers go in. They're sitting in the raised garden beds that normally would be full of spinach and radishes by now. Everything is on hold for the sprinklers, and I feel completely discombobulated by missing my usual spring routine of digging and planting. 

I have to keep reminding myself that Rome wasn't built in a day and my new yard and gardens will take some time.


I'm happy to report that at least the clematises I planted last year are doing well, safe from being moved for the sprinklers because they grow up out of the way on their trellis.

So, progress is being made. It's just not very photogenic progress. I hope to have photos of fresh new lawns, dewy with drops of automatically sprinkled water, to share in a few weeks.

Please join me today at the fun new Garden Party at Elizabeth & Co.  

Elizabeth & Co.
Thanks so much for stopping by today!


{ If you're interested in seeing more of my former yard, please visit the My Urban Garden tab at the top of this page.}